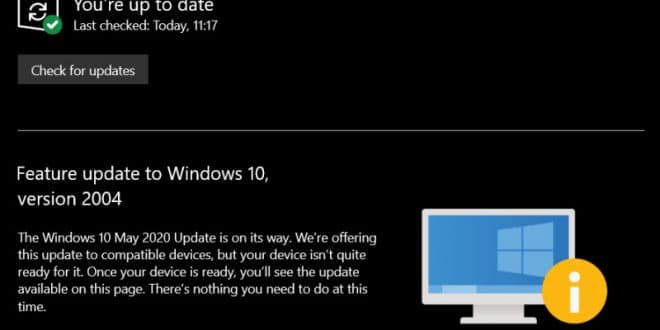
“Every time I try to shut down my computer, I was forced to update my Windows 10. But I really don’t want to update my operating system because the automatic update might take up the system and network resources. Is there anybody can help me solve this problem and disable Windows 10 update? Thanks in advance.”
All solutions to disable Windows 10 update:
- Solution 1. Disable Windows Update Service
- Solution 2. Change the Settings of the Group Policy Editor
- Solution 3. Meter Your Network Connection
- Solution 4. Change the Way of Windows 10 Updates Using Registry
Tip
Before proceeding with the four solutions to fully stop Windows 10 updates, check your own Windows 10 edition (Home, Professional, Education or Enterprise) by going to Settings -> System -> About so that you can find the most appropriate solution. Besides, the fourth way of trying to control the Windows 10 update by using Registry is somewhat risky, do remember to back up your data and the details will be shown in the extra tips section.
How to Disable Windows 10 Update
Follow the methods below to disable Windows 10 update correctly.
Solution 1. Disable Windows Update Service
Understand the limitations of this method. While disabling the automatic update service will temporarily halt any Windows 10 cumulative updates, the service will re-enable itself after a certain amount of time. Here are the directions:
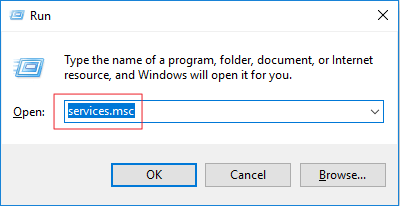
1. Press the Windows logo key + Rat the same time to invoke the Run box.
2.Type services.msc and press Enter.
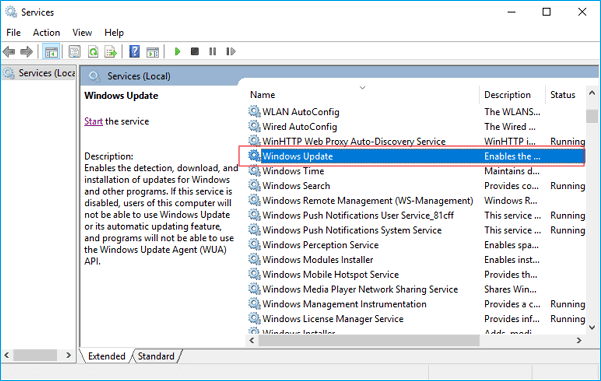
3. Scroll down to Windows Update, and double-click it.
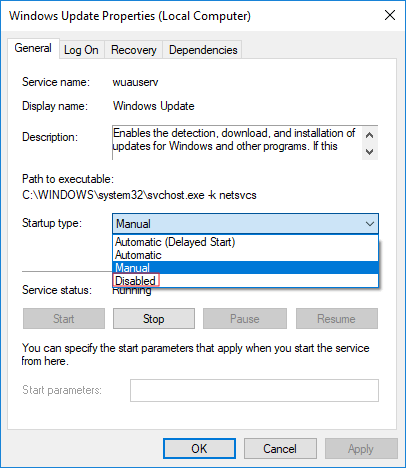
4. In Startup type, select “Disabled”. Then click “Apply” and “OK” to save the settings.
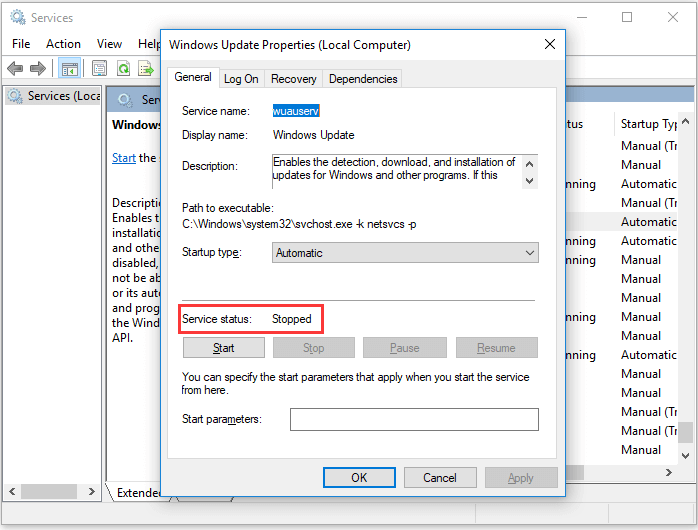
Step 4. If you want to check whether you have disabled the service automatically, go to “Start” > type “Services” > right-click “Services” and choose “Run as administrator”.
Step 5. In the list of services, find and right-click “Windows Update” > “Properties”. In the “Service status” section, you should see the service has been stopped.
Solution 2. Change the Setting of the Group Policy Editor
The Group Policy feature is not available in the Home edition. So, only when you run Windows 10 Professional, Enterprise, or Education, you can use the Group Policy Editor to change the settings to prevent Windows 10 from automatically updating. The group policy editor will notify you of new updates without automatically installing them.
- Press the Windows logo key + R then type gpedit.msc and click OK.
- Go to “Computer Configuration” > “Administrative Templates” > “Windows Components” > “Windows Update”.
- Double-click “Configure Automatic Updates”.
- Select “Disabled” in Configured Automatic Updates on the left, and click Apply and “OK”to disable the Windows automatic update feature.
Note: If you need to update your Windows version later, you can repeat the steps above, then select Enabled to turn on this feature, so that you can continue to download the updates.
Solution 3. Meter Your Network Connection
Understand that this method won’t work for Ethernet connections. You can only disable automatic updates by using this method on a Wi-Fi connection. If your computer is connected to WiFi, you can try this to stop Windows 10 automatic updates.
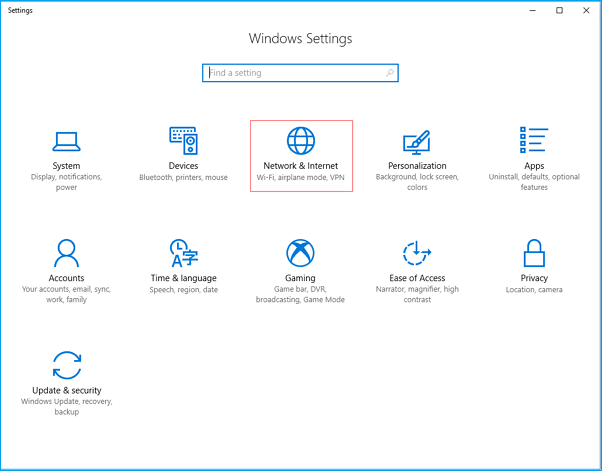
1. Click the Start button at the bottom left on your desktop, then click the “Settings” app.
2. Click “Network & Internet”.
3. Click WiF in the left pane, then click the name of your Wi-Fi connection.
4. Click to turn on Set as metered connection.
Solution 4. Change the way of Windows 10 Updates Using Registry
Extra Tips: Editing the registry is risky, and it can cause irreversible damage to your installation if you don’t do it correctly. It’s recommended that you make a full backup of your computer before proceeding.
1. Use the Windows key + R keyboard shortcut to open the Run command.
2. Type regedit, and click OK to open the Registry.
Browse the following path:
HKEY_LOCAL_MACHINE\SOFTWARE\Policies\Microsoft\Windows
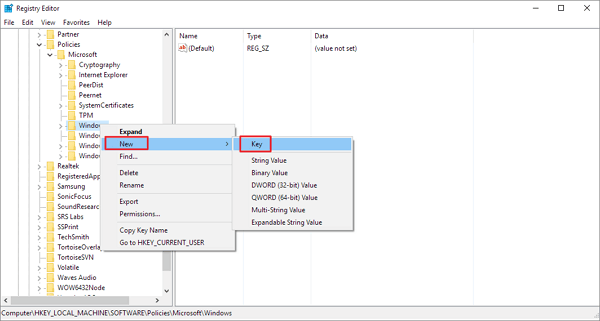
3. Right-click the Windows (folder) key, select “New” and then click “Key”.
4. Name the new key “WindowsUpdate” and press “Enter”.
5. Right-click the newly created key, select “new”, and click “Key”.
6. Name the new key AU and press Enter.
Inside the newly created key, right-click on the right side, select “New”, and click on “DWORD (32-bit) Value”.
7. Name the new key AUOptions and press Enter.
Double-click the newly created key and change its value to 2. It’s for “Notify for download and notify for install”. Click “OK”.
8. Close the Registry to complete the task.
Using this value prevents Windows 10 from downloading updates automatically, and you’ll get a notification when new updates are available. By this way, you can avoid any auto Windows 10 update effectively.
That’s how you could make an attempt to disable Windows 10 update in every way. Each method has been proved to work as long as you wish to turn off all the automatic updates in Windows 10.